Installing MetalLB Load Balancer#
This tutorial covers the installation of MetalLB load balancer on k0s. k0s doesn't come with an in-built load balancer, but it's easy to deploy MetalLB as shown in this document.
About Load Balancers#
Load balancers can be used for exposing applications to the external network. Load balancer provides a single IP address to route incoming requests to your app. In order to successfully create Kubernetes services of type LoadBalancer, you need to have the load balancer (implementation) available for Kubernetes.
Load balancer can be implemented by a cloud provider as an external service (with additional cost). This can also be implemented internally in the Kubernetes cluster (pure SW solution) with MetalLB.
MetalLB#
MetalLB implements the Kubernetes service of type LoadBalancer. When a LoadBalancer service is requested, MetalLB allocates an IP address from the configured range and makes the network aware that the IP “lives” in the cluster.
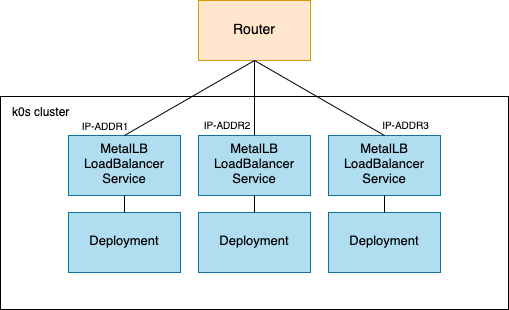
One of the benefits of MetalLB is that you avoid all cloud provider dependencies. That's why MetalLB is typically used for bare-metal deployments.
See the MetalLB requirements in the MetalLB's official documentation. By default, k0s runs with Kube-Router CNI, which is compatible with MetalLB as long as you don't use MetalLB’s BGP mode. If you are not using Kube-Router and you are using kube-proxy in IPVS mode, you need to enable strict ARP mode in kube-proxy. See MetalLB preparations.
Port 7946 (TCP & UDP) must be allowed between the nodes. In addition, before installing MetalLB, make sure there is no other software running on port 7946 on the nodes, such as docker daemon.
Install MetalLB#
-
Install MetalLB using the official manifests by MetalLB
kubectl apply -f https://raw.githubusercontent.com/metallb/metallb/v0.10.2/manifests/namespace.yaml kubectl apply -f https://raw.githubusercontent.com/metallb/metallb/v0.10.2/manifests/metallb.yaml -
Create ConfigMap for MetalLB
Next you need to create ConfigMap, which includes an IP address range for the load balancer. The pool of IPs must be dedicated to MetalLB's use. You can't reuse for example the Kubernetes node IPs or IPs controlled by other services. You can, however, use private IP addresses, for example 192.168.1.180-192.168.1.199, but then you need to take care of the routing from the external network if you need external access. In this example, we don't need it.
Create a YAML file accordingly, and deploy it:
kubectl apply -f metallb-configmap.yamlapiVersion: v1 kind: ConfigMap metadata: namespace: metallb-system name: config data: config: | address-pools: - name: default protocol: layer2 addresses: - <ip-address-range-start>-<ip-address-range-stop> -
Deploy an example application (web server) with a load balancer
apiVersion: v1 kind: Namespace metadata: name: web --- apiVersion: apps/v1 kind: Deployment metadata: name: web-server namespace: web spec: selector: matchLabels: app: web template: metadata: labels: app: web spec: containers: - name: httpd image: httpd:2.4.53-alpine ports: - containerPort: 80 --- apiVersion: v1 kind: Service metadata: name: web-server-service namespace: web spec: selector: app: web ports: - protocol: TCP port: 80 targetPort: 80 type: LoadBalancer -
Check your LoadBalancer
Run the following command to see your LoadBalancer with the external-ip and port.
kubectl get service -n web -
Access your example application
If you used private IP addresses for MetalLB in the ConfigMap (in step 2), you should run the following command from the local network. Use the IP address from the previous step.
curl <EXTERNAL-IP>If you are successful, you should see
<html><body><h1>It works!</h1></body></html>.
Additional information#
For more information about MetalLB installation, take a look at the official MetalLB documentation.
Alternative examples#
Get load balancer using cloud provider.