Using GitOps with Flux#
This tutorial describes the benefits of using GitOps with k0s and provides an example of deploying an application with Flux v2.
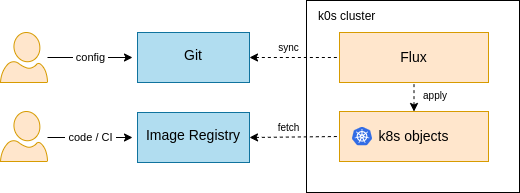
GitOps is a practice where you leverage Git as the single source of truth. It offers a declarative way to do Kubernetes cluster management and application delivery. The desired states, using Kubernetes manifests and helm packages, are pulled from a git repository and automatically deployed to the cluster. This also makes it quick to re-deploy and recover applications whenever needed.
Why GitOps with k0s#
k0s doesn't come with a lot of different extensions and add-ons that some users might find useful (and some not). Instead, k0s comes with 100% upstream Kubernetes and is compatible with all Kubernetes extensions. This makes it easy for k0s users to freely select the needed extensions that their applications and infrastructure need, without conflicting to any predefined options. Now, GitOps is a perfect practice to deploy these extensions automatically with applications by defining and configuring them directly in Git. This will also help with cluster security as the cluster doesn't need to be accessed directly when application changes are needed. However, this puts more stress on the Git access control, because changes in Git are propagated automatically to the cluster.
Install k0s#
Let's start by installing k0s. Any k0s deployment option will do, but to keep things simple, this Quick Start Guide gets you started with a single node k0s cluster.
Run these three commands to download k0s, install and start it:
curl -sSLf https://get.k0s.sh | sudo sh
sudo k0s install controller --single
sudo k0s start
Set kubeconfig#
Next, you need to set the KUBECONFIG variable, which is needed by Flux CLI later on.
sudo k0s kubeconfig admin > kubeconfig
export KUBECONFIG=$PWD/kubeconfig
Install Flux#
To proceed with Flux, install the Flux CLI, which is used for configuring Flux to your Kubernetes cluster. For macOS and Linux, this can be done either with brew or bash script. Use one of them:
brew install fluxcd/tap/flux
or
curl -s https://fluxcd.io/install.sh | sudo bash
For more details of the Flux installation, check the Flux documentation.
Configure Flux for a GitHub repository#
Export your GitHub personal access token (instructions how to get it) and username:
export GITHUB_TOKEN=<your-token>
export GITHUB_USER=<your-username>
Come up with a GitHub repo name (e.g. flux-demo), which will be used by Flux to store (and sync) the config files.
export GITHUB_REPO_NAME=<select-repo-name-to-be-created>
Bootstrap flux to your cluster. The GitHub repo will be created automatically by Flux:
flux bootstrap github \
--owner=$GITHUB_USER \
--repository=$GITHUB_REPO_NAME \
--branch=main \
--path=./clusters/my-cluster \
--personal
Now you are all set with Flux and can proceed to deploy your first application.
Deploy example application#
Next, we'll deploy a simple web application and expose it using a NodePort service. In the previous step, we configured Flux to track the path /clusters/my-cluster/ in your repository. Now clone the repo to your local machine:
git clone git@github.com:$GITHUB_USER/$GITHUB_REPO_NAME.git
cd $GITHUB_REPO_NAME/clusters/my-cluster/
Create the following YAML file (simple-web-server-with-nodeport.yaml) into the same directory:
apiVersion: v1
kind: Namespace
metadata:
  name: web
---
apiVersion: apps/v1
kind: Deployment
metadata:
  name: web-server
  namespace: web
spec:
  selector:
    matchLabels:
      app: web
    template:
      metadata:
        labels:
          app: web
      spec:
        containers:
        - name: httpd
          image: httpd:2.4.53-alpine
          ports:
          - containerPort: 80
---
apiVersion: v1
kind: Service
metadata:
  name: web-server-service
  namespace: web
spec:
  type: NodePort
  selector:
    app: web
  ports:
    - port: 80
      targetPort: 80
      nodePort: 30003
Then push the new file to the repository:
git add .
git commit -m "Add web server manifest"
git push
Check that Flux detects your changes and the web server gets applied (by default this should happen within 1 min):
flux get kustomizations
If the deployment went successfully, you should see the newly added objects:
sudo k0s kubectl get all -n web
You can try to access the web application using
curl localhost:30003
or by using a web browser http://localhost:30003.
Voilà! You have now installed the example application using the GitOps method with Flux. As a next step you can try to modify the web app YAML file or add another application directly in to the Git repo and see how Flux will automatically pick up the changes without accessing the cluster with kubectl.
Uninstall Flux#
If you want to uninstall Flux from the cluster, run:
flux uninstall --namespace=flux-system
Your applications, which were installed by Flux, will remain in the cluster, but you don't have the Flux processes anymore to sync up the desired state from Git.